Quick and Easy Birds in Nests cookies
Spring is finally here! And wouldn't you know it, while the rest of the county is getting an unexpected warm spell we have snow. I guess if I want to see birdies in the first days of spring I'll just have to make them myself!
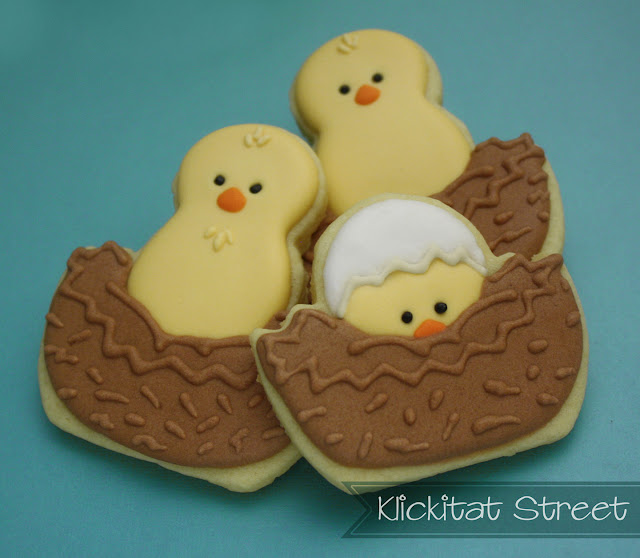
Hehe, aren't they cute! For these bird cookies I used the chick-in-an-egg cutter from this Easter set by Wilton. This is a pretty popular set of cutters this time of year and you should still be able to find it at your local craft store.

When cutting the cookies trim the base off the bottom of the "egg" with a knife to make the nest. If you trim off the little beak piece too then the chick can face forward.
Start by outlining and filling the chick in yellow royal icing. I like to use the 20-second or 20 count icing consistency. Don't worry about shaping the bottom of the chick since you can do that in the next step. While the icing is still wet drop in some black sprinkles or candy beads for eyes. Let the chick dry for an hour or so.
 Once the chick has dried a bit, outline and fill the nest in chocolate or brown 20-count icing. Tuck the chick into the nest by piping the brown over the base of his body. While the icing is still wet you can sprinkle on a little shredded coconut tinted with cocoa powder for a "nest" effect. Let the brown icing dry for several hours or overnight.

Once the icing is dry add details to the nests and chicks. Since the details here don't need to be too fine or precise I used the same 20 count icings from earlier with a smaller decorating tip.
I also made little peeking chicks by trimming off the "head" of the chick-in-an-egg cutter and using a little white icing for a shell cap.

I hope you like these little guys and are enjoying your first days of Spring!


Hehe, aren't they cute! For these bird cookies I used the chick-in-an-egg cutter from this Easter set by Wilton. This is a pretty popular set of cutters this time of year and you should still be able to find it at your local craft store.

When cutting the cookies trim the base off the bottom of the "egg" with a knife to make the nest. If you trim off the little beak piece too then the chick can face forward.
Start by outlining and filling the chick in yellow royal icing. I like to use the 20-second or 20 count icing consistency. Don't worry about shaping the bottom of the chick since you can do that in the next step. While the icing is still wet drop in some black sprinkles or candy beads for eyes. Let the chick dry for an hour or so.


Once the icing is dry add details to the nests and chicks. Since the details here don't need to be too fine or precise I used the same 20 count icings from earlier with a smaller decorating tip.
I also made little peeking chicks by trimming off the "head" of the chick-in-an-egg cutter and using a little white icing for a shell cap.

I hope you like these little guys and are enjoying your first days of Spring!


Adorable, Sarah! :)
ReplyDeleteThank you Pam! I love all the little birds on your blog today too!
DeleteI saw that cutter in the store and didn't get it! Now I wish I had! Adorable and thanks for sharing the tutorial with us!
ReplyDelete