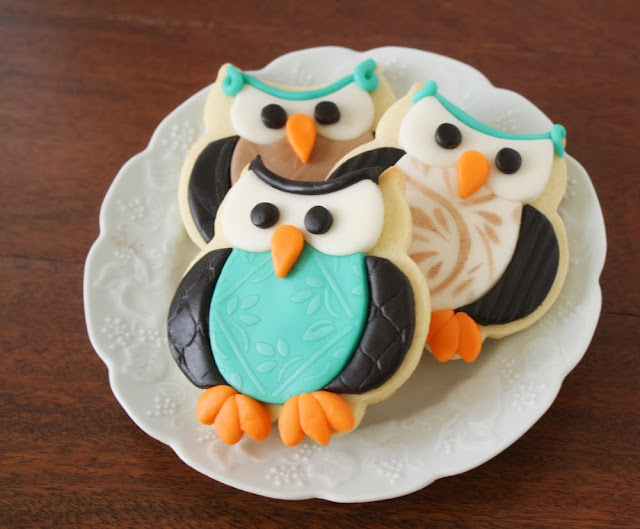
Textured Owls Cookie Tutorial
There is just something about owl cookies that make me happy. And for some reason every time I think of making owls I think they should be textured and patterned to the nines. I've made patterned owl cookies before using royal icing and a lot of piping but this time around I dressed them up with textured fondant. I am certainly no expert in working with fondant but it's fairly easy when you only have to cover a cookie.
To make these textured owl cookies you will need:
- an owl cookie cutter. I used my own chubby owl cutter that I designed and it's for sale in my Etsy store.
- a few cookie cutters in basic shapes to cut a belly and eyes
- tinted fondant or modeling chocolate
- texture mats, stencils, or other patterned objects
- a small rolling pin and a craft knife
You can use just about anything to texture fondant. So much so that avoiding impressions in the fondant is usually the hard part of working with it. The plastic mat pictured is just some random vinyl I happened to have but it creates nice lines. Anything that has a texture will work so get creative! Be sure to run it through the dishwasher and it will be fine for incidental food contact.
Obviously, fondant texture plates are made for this but you can also use stencils to give a light texture to fondant. Stencils are a hot item in the cookie world right now and there are so many amazing designs to choose from. Try Salsa Sweets, The Cookie Countess or Artfully Designed for some fabulous finds!
It is super easy to use stencils to texture fondant. Especially when you only need to work with small pieces for cookies. Start by rolling out the fondant a little thicker than you want it to be on the cookie.
- Lay your clean stencil on the fondant and gently roll the stencil into the fondant with a small rolling pin. You don't want to go too fast or use too much pressure because the stencil might lift up and could get damaged.
- If you like you can add extra color, sparkle or dimension by dusting the fondant with petal dust and a brush. Since the stencil is secured to the fondant only the cut outs will be colored.
- Gently peel the stencil away and the fondant will have a light texture.
You can really see the effect of a light shimmer dust on the dark fondant. This is a really easy technique but it looks so good!
After you texture the fondant you are ready to decorate the owl.
- Cut the owl shape with your cookie cutter
- Cut the belly shape with a small egg or circle cookie cutter and cut a place for the eyes with a heart.
- Gently remove the excess fondant and "glue" the belly to the cookie with simple syrup. Be sure to save the wings for a different cookie.
- Repeat these steps with a contrasting color of fondant to make the wings and attach them to the cookie as well.
To finish up the owls cut eyes from white fondant using the small heart cutter and trim them with a circle. Cut pupils for the eyes from dark fondant with a decorating tip. Roll a short fondant rope and attach to the top of the head for the tufted "horn" feathers. I used these teeny-tiny cutters to make the feet and beak but if you don't have them you could just cut little "sausage" shapes from an orange fondant rope instead.
That's all there is too it. I love seeing these little guys all line up like this and I hope you enjoy them too!


Sarah, These are sooo cute! I'd love to know where you found this chubby owl cutter. I've been on the hunt for one! Thanks for sharing.
ReplyDeleteHi Joan,
DeleteThe owl cutter is my own design and I sell them in my Etsy store.
https://www.etsy.com/listing/164635147/handmade-chubby-owl-cookie-cutter
Thanks!
Adorable Sarah!
ReplyDeleteI have not put fondant on cookies for awhile but I have a few customers that really prefer MMF because it tastes like buttercream. Thanks for this tutorial!